I’ve been using some (f)un-employment time to remind and upskill my knowledge of AWS. I’ve also wanted to try out the serverless framework to build apps using AWS Lambda functions with F# via fable.
I want to use fable to create AWS Lambdas that run the node.js runtime (rather than dotnet) to form the back-end of the application. The front-end application will also be written in F# and converted to a React.Js Javascript single page app.
Err… what?
AWS Lambda is a “functions as a service” technology that makes it easy to build “serverless” applications. “serverless” applications have a lot of the deployment and running considerations abstracted away and are useful for apps that need to scale on demand and that may not be used often.
AWS Lambda functions can be written in a variety of languages/runtimes including Java, Node.js, .Net Core and Python.
The serverless framework is a set of tools that allow “serverless” applications to be developed and deployed easily.
The main feature is the serverless cli which consumes YAML config files and can generate code to deploy applications and resources.
fable is a compiler that can transpile F# code to Javascript, which allows F# code to be run on the same platforms as Javascript code.
fable works at the language level and passes the F# abstract syntax tree to the babel compiler which can output Javascript.
Err… why?
There are a few advantages of trying this approach:
cost - serverless applications don’t have some of the same up front costs as other methods of deploying apps using a “best-practice” approach. A zero-to-low traffic serverless app will likely fall into the free-tier for most cloud provider services.
client-server code sharing - fable allows the same strongly typed code to be run on the back-end and front-end. This is currently possible with typescript, but i’m a bigger fan of the F# type-system.
This means that dtos, validation logic and domain types can be shared, this potentially removes some kinds of bugs and can help speed up development time.
Runtime - Targeting the node.js runtime allows access to a formidable amount of third-party libraries on the npm repository. This is especially useful for AWS libraries where the .Net client libraries can lag behind the node.js version in terms of maturity.
Another big advantage is that the “cold start” time for node.js is lower than for dotnet. It’s not a huge difference, but these start times can compound if there is a chain of lambda calls.
Architecture
The app consists of a static SPA site stored on AWS S3, that is hosted with the AWS Cloudfront CDN.
The back-end consists of a collection of AWS Lambda functions that form a REST API with the addition of an AWS API Gateway.
The application sends requests to the gateway by customising the CDN’s behaviour to direct calls to the <CDNBase>/api/<path> to the gateway.
Api
Shared code
A big advantage as described above is the possibility to share code across the front and backend code bases. In this case a file called Shared.fs is used in both and it contains a couple of DTOs to create and receive a customer:
module Shared

module Dtos =
    type CustomerCreate = { Name: string; Age: int; }
    type Customer =       { Name: string; Age: int; Id: int; }
Functions
The Api consists of two AWS Lambda functions, customerGet and customerPost, written in F# and transpiled to Javascript.
Functions invoked by AWS Lambda need to have two arguments, these are often called event and context.
event - contains information about the trigger of the function, in this case data relating to the API Gateway and REST call details.
context - contains information on the context of the call, which includes AWS specific information like resource and user identifiers. Context also provides the methods required to respond to the request call. API Gateway expects an object that contains information on the response statusCode, headers and body to be passed to the context.succeed method.
The event and context objects need type definitions to be used with fable. These can be derived by deploying empty functions and using console.log to work out the property names and types. In the solution these types form an AwsTypes module.
Helper functions to create common responses with API Gateway can be defined:
open Fable.Core.JsInterop
open Fable.Core.JS
open AwsTypes

let apiGatewayResponse code body =
    {
        isBase64Encoded = false
        statusCode = code
        headers = createEmpty
        body = JSON.stringify body
    }

let ok body = apiGatewayResponse 200 body
let notFound = apiGatewayResponse 404 ""
let badRequest body = apiGatewayResponse 400 body
This allows creation of the responses ok, notFound and badRequest with the appropriate status codes and arguments for body where appropriate.
The customerPost function shows an implementation of a POST method as a Lambda function. The required arguments are shown with the types ApiGatewayEvent and AwsLambdaContext.
The event.body contains the string representation of the request body of type CustomerCreate which can be deserialised using the tryParseAs method from the Fable.SimpleJson library.
If the object can be parsed then the function returns a Customer with an ok response, otherwise it creates a badRequest with the error. The response needs to be passed to context.succeed for API Gateway to return the response to the front-end app.
open Fable.SimpleJson
open Shared.Dtos

let customerPost ((event: ApiGatewayEvent), (context: AwsLambdaContext)) =
    match event.body |> Json.tryParseAs<CustomerCreate> with
    | Ok dto ->
        // act as if this is saved somewhere and return a Customer.
        ok { Id = 234; Name = dto.Name; Age = dto.Age; }
    | Error error -> badRequest error
    |> context.succeed
The customerGet function implements a service to find and return customers. The function retrieves the id from the event.pathParameters object and either returns the Customer in an ok (if the Id is 123) or returns a notFound response.
open Fable.Core.DynamicExtensions

let getId pathParameters = pathParameters.["id"].ToString()

let tryFindCustomer id =
    // pretending as if this is retrieving from a database or similar
    match id with
    | "123" -> Some { Id = 123; Name = "John"; Age = 30; }
    | _ -> None

let tryGetCustomer = getId >> tryFindCustomer

let customerGet ((event: ApiGatewayEvent), (context: AwsLambdaContext)) =
    match tryGetCustomer event.pathParameters with
    | Some customer -> ok customer
    | None          -> notFound
    |> context.succeed
Fable config
fable is called and configured using webpack. The webpack build needs some fable and babel related npm packages to run which can be restored from a package.json file.
The .fs files that contain the above code are specified in a Services.fsproj project file, along with the nuget dependencies.
Fable works at the language level and loads code from the project file and all of the libraries into an AST. It then converts this to one that babel can use and outputs this as Javascript.
The webpack config file is quite involved and can be seen at the project code repo. A notable part of the config are the entry and output nodes which detail the .fsproj file and the desired bundle output:
  entry: './src/Services.fsproj',
  output: {
    path: path.join(__dirname, "./"),
    filename: 'deploy.js',
    library:"services",
    libraryTarget: 'commonjs'
  },
The config tells webpack that the files in the ./src/Services.fsproj file need to be compiled as a commonjs module called services into a file called deploy.js in the working directory.
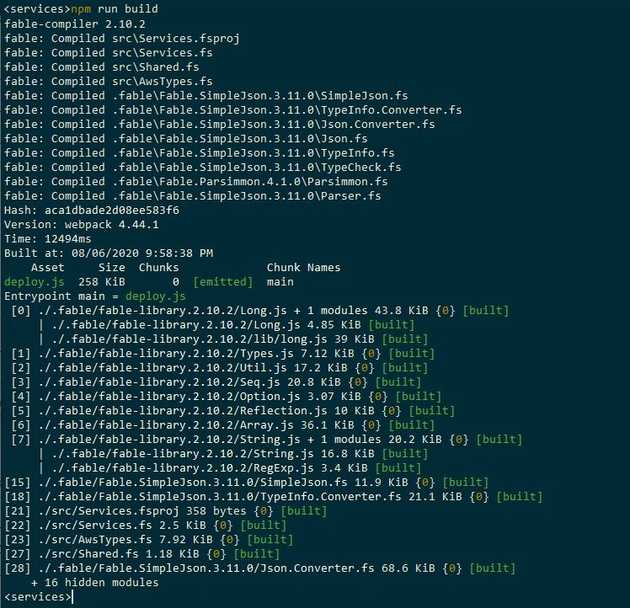
The bundle can be produced by running webpack, this is commonly included as the build script in a package.json file so that it can be called with npm run build:
Api - deployment
The serverless framework is used to develop and deploy the back-end code. Functions and resources are defined using an infrastructure-as-code approach in a file called serverless.yml.
The Api for this project is going to be referred to as services, will run the latest version of node.js and will be deployed to AWS’s eu-west-1 region so the file starts with:
service: services

provider:
  name: aws
  runtime: nodejs12.x
  stage: api
  region: eu-west-1
The stage: api is a bit of a hack to ensure that the url paths start with /api/ as the serverless aws plugin automatically creates the infrastructure this way.
The api is going to consist of a GET /customer/{id} and a POST /customer. These will invoke two Javascript functions located in a services module, that are minified into a deploy.js file that serverless will wrap up into a .zip file.
The api paths and deployment are configured in the serverless.yml file:
package:
  exclude:
    - ./**
  include:
    - deploy.js

functions:
  customerPost:
    #   (deploy.js).<module>.<exportedJsMethod>
    handler: deploy.services.customerPost
    events:
      - http:
          path: customer
          method: post

  customerGet:
    handler: deploy.services.customerGet
    events:
      - http:
          path: customer/{id}
          method: get
The package specifies what is to be included in the .zip file using glob patterns. In this case it ignores everything apart from the deploy.js file.
The functions node defines the lambda functions to be deployed. Each named function node specifies the path of the javascript function that handles the call and the events they are invoked by.
The handler specifies the exported Javascript function to be invoked with <fileName>.<moduleName>.<functionName>.
The functions config is designed to be abstractable across different cloud providers and in this case the http node sets up an API Gateway deployment with the specified path and method.
Deployment
Once the code has been built into a deploy.js file and the serverless cli is configured with the appropriate AWS account, then the api is ready to be deployed.
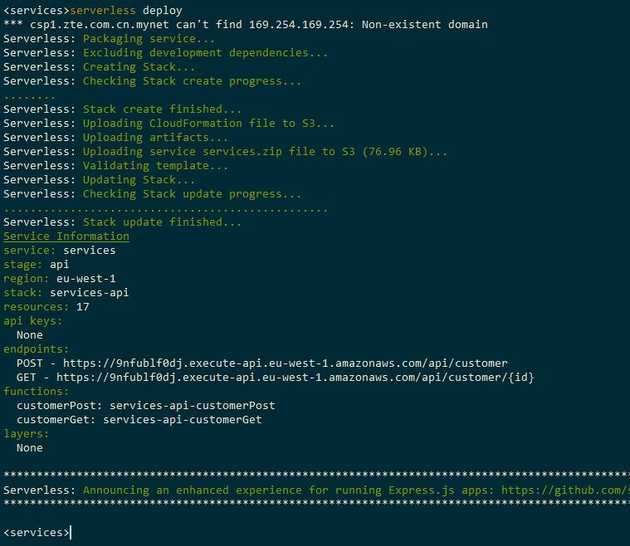
The serverless cli makes this a simple task of running the command
serverless deployThis will create the required .zip file and cloudformation templates into a .serverless folder and create the resources with cloudformation. It then uploads the zip file to S3 where it can be deployed from and returns the urls that can be used to call the Lambdas from API Gateway.
The urls of the deployed functions are listed and these can be used to find the host of the API Gateway.
Here the host is 9nfublf0dj.execute-api.eu-west-1.amazonaws.com, this will be used as a source for the Cloudfront CDN.
Site
With the api up and running the site can be created. The site is the Feliz dotnet template with enough functionality to make the two requests. The site is built using webpack as above and builds to a deploy folder, which will be uploaded to S3.
Only the site deployment is going to be described, but for those who might not have seen an elmish app before, the code is nice and can be seen here. Again it is worth pointing out the benefits of the code sharing across the client and server.
The site deployment config is specified in another serverless.yml file in the site code base. The file specifies the cloud provider to use and some custom variables including the api endpoint and api url part, and an S3 bucket name to use.
service: site

custom:
  s3Bucket: fable-aws-serverless-site-chestercodes
  apiEndpointHost: 9nfublf0dj.execute-api.eu-west-1.amazonaws.com
  servicesStage: api

provider:
  name: aws
  region: eu-west-1
The config file then just needs to create some resources in a resources node. The Resources node within contains yaml that is mostly the same as AWS Cloudformation yaml but has slightly different special operator keywords.
The first thing to create is an S3 bucket to contain the contents of the deploy folder. The yaml below shows this with the name substituted with the s3Bucket from the custom variables.
resources:
  Resources:
    WebAppS3Bucket:
      Type: AWS::S3::Bucket
      Properties:
        BucketName: ${self:custom.s3Bucket}
        AccessControl: PublicRead
For security it’s best practice to limit the access of the S3 bucket to just the AWS Cloudfront instance. This requires a AWS::CloudFront::CloudFrontOriginAccessIdentity and bucket policy that links the bucket resource to the identity with the permission to read the contents:
    WebAppS3BucketPolicy:
      Type: 'AWS::S3::BucketPolicy'
      Properties:
        Bucket:
          Ref: WebAppS3Bucket
        PolicyDocument:
          Statement:
            - Action:
                - 's3:GetObject'
              Effect: 'Allow'
              Principal:
                CanonicalUser: !GetAtt CfOriginAccessIdentity.S3CanonicalUserId
              Resource: arn:aws:s3:::${self:custom.s3Bucket}/*

    CfOriginAccessIdentity:
      Type: "AWS::CloudFront::CloudFrontOriginAccessIdentity"
      Properties:
        CloudFrontOriginAccessIdentityConfig:
          Comment: 'Access S3 bucket content only through CloudFront'
The last step is to define the cloudfront instance. This is quite involved but starts by specifying:
    WebAppCloudFrontDistribution:
      Type: AWS::CloudFront::Distribution
      Properties:
        DistributionConfig:
          Enabled: 'true'
          DefaultRootObject: index.html
          CustomErrorResponses:
            - ErrorCode: 404
              ResponseCode: 200
              ResponsePagePath: /index.html
This states that we want a cloudfront distribution that is enabled, has a default page of index.html and redirects missing pages to the default one.
Still within the DistributionConfig we define the sources of information that the CDN uses:
          Origins:
          - Id: WebApp
            DomainName: ${self:custom.s3Bucket}.s3.amazonaws.com
            S3OriginConfig:
              OriginAccessIdentity:
                !Join
                  - ''
                  - - 'origin-access-identity/cloudfront/'
                    - Ref: CfOriginAccessIdentity
          - Id: WebApi
            DomainName: ${self:custom.apiEndpointHost}
            CustomOriginConfig:
              HTTPPort: 80
              HTTPSPort: 443
              OriginProtocolPolicy: https-only
This defines two sources ẀebApp and WebApi which are configured to the S3 bucket and the apiEndpointHost where the API Gateway is hosted.
Then need to define the CDN behaviours. The DefaultCacheBehavior is used to respond with the static site files. The static files are loaded from S3 and this link is established by specifying the TargetOriginId of WebApp.
The required behaviour will be specific to the app, here i’ve chosen to restrict the AllowedMethods to GET and HEAD, remove the cookies and forward the query string.
The first of the CacheBehaviors takes preference over the default and specifies requests that include the /${self:custom.servicesStage}/ (in this case /api/) url part. It directs request to the WebApi target with no restricted request methods or caching.
          DefaultCacheBehavior:
            AllowedMethods:
              - GET
              - HEAD
            ForwardedValues:
              QueryString: 'true'
              Cookies:
                Forward: none
            TargetOriginId: WebApp
            ViewerProtocolPolicy: redirect-to-https
          CacheBehaviors:
            - AllowedMethods:
                - DELETE
                - GET
                - HEAD
                - OPTIONS
                - PATCH
                - POST
                - PUT
              TargetOriginId: WebApi
              PathPattern: /${self:custom.servicesStage}/*
              DefaultTTL: 0
              MinTTL: 0
              MaxTTL: 0
              ForwardedValues:
                QueryString: 'true'
                Headers:
                - Accept
                - Referer
                - Authorization
                - Content-Type
              ViewerProtocolPolicy: https-only
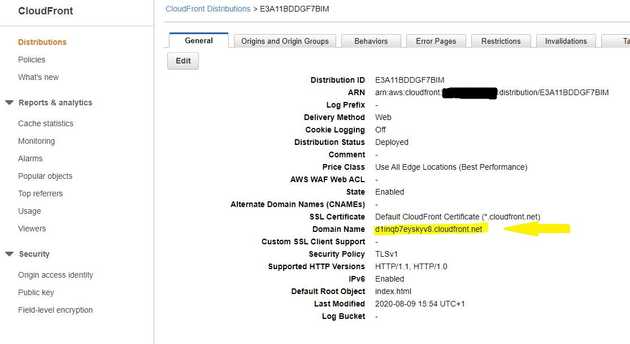
The site can be deployed with the command serverless deploy and when the cloudformation template is deployed the created cloudfront resource can be seen:
The domain name is listed on the cloudfront panel, here highlighted in yellow, and a custom domain can easily be added using Route 53 and AWS Certificate manager.
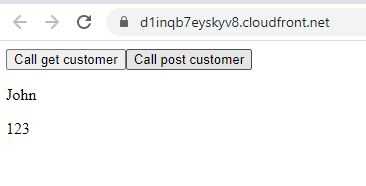
Once the deploy folder contents have been uploaded to the S3 bucket and the cloudfront instance has had about an hour to recognise the bucket then the site can be seen.
Here the contents of the customerGet call has been rendered onto the page.
Conclusion
The steps above detail how to create a “serverless” app on AWS using F#, fable and the serverless framework.
The documentation for some of the above was a bit sparse and then configuration of cloudfront was a bit frustrating at times. But overall I think that this is a good approach for certain kinds of application.
The code is on my github for those interested :)


